 stickdriftest
You let go of the stick, but the camera keeps creeping to the right. You raise the deadzone and the movement stops. Then aiming feels a little less precise. Both changes make sense: the game is now ignoring more of the stick’s travel around the center.
A deadzone can make a controller easier to use. It does not tell you why the stick moved in the first place, and it does not repair it. Here is how to separate those things before changing a setting.
What is a controller deadzone?
A controller deadzone is a region of stick input that a game or another input-processing layer treats as neutral. For an inner deadzone, that region sits around the center. Move the stick within it and the game sends no movement; move beyond it and the game starts responding.
That is why a tester can show a small off-center input while your character stands still. The game may be ignoring it. The browser and the game can also receive differently processed inputs, so the numbers are not a direct window into the game’s settings.
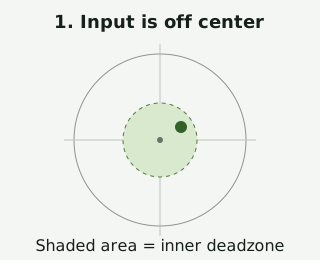
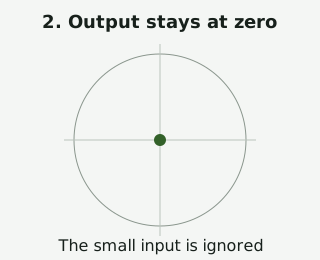
For a made-up example, imagine a stick sitting at 6% of the axis’s full scale to the right. A simple radial deadzone of 10% would ignore that input. That example explains the idea; it is not a recommended deadzone or a pass/fail threshold for your controller.
Inner, outer and anti-deadzone: the short version
Inner deadzone
This is the space around neutral where small inputs are ignored. Increasing it can stop slight unwanted movement, but you must move the stick farther before the game responds. Too much can make fine adjustments feel missing.
Outer deadzone
This concerns the far end of the stick’s travel. An outer threshold can let the game reach full output before the stick reaches its physical edge. A slider might describe the ignored outer margin or the point where full output begins, so check the game’s explanation before assuming which direction increases it.
Anti-deadzone
This usually raises the first nonzero output so an input can get past another deadzone farther along the chain. It is not another name for drift correction. Too much can turn a gentle movement into a noticeable jump.
Shape matters too. A radial deadzone uses distance from the center; an axial one handles the horizontal and vertical axes separately. Two sliders both labelled “10%” need not feel alike if their shapes, response curves or processing order differ.
Deadzone is not the same as sensitivity or calibration
Deadzone decides which input to ignore. Sensitivity changes how strongly the game reacts to input it accepts. Reducing sensitivity might slow a drifting camera without stopping the unwanted input.
Calibration concerns how a system interprets the center or range. What can be calibrated depends on the controller and software. A game's settings, a hardware recalibration tool and this site's browser preview are not interchangeable.
Our controller calibration guide explains exactly what the preview changes. It never writes settings to the controller, changes your games or corrects the readings used for the resting test.
How to choose a deadzone without guessing
There is no best value for every controller and every game. Start with the behavior you want to change, then make one small adjustment at a time.
- Write down the original setting. Check which stick the slider affects. That makes it easy to undo a change that feels worse.
- Observe the stick at rest. Use the stick drift test, release both sticks and run a resting check. Repeat it if you touched the controller.
- Change the relevant in-game setting a little. If the game offers an inner deadzone, see whether a small increase stops the unwanted movement.
- Test deliberate, slow movements. Check whether you can still make the small aiming or steering adjustments you need. A quiet camera is not much help if the controls now feel unresponsive.
- Compare in the same game. Keep sensitivity and other settings unchanged while judging this adjustment. The left and right sticks may need different treatment.
A browser offset percentage is not a number to copy straight into a game’s slider. Firmware, drivers, remapping software and the game can each affect the result.
See the difference in the deadzone preview
If you would rather see the idea before changing a game, open the separate deadzone preview. Start live view in the tester above it, leave the sticks untouched and move the preview slider. Then make a few gentle stick movements.
The preview applies a radial deadzone: inputs inside the chosen radius become zero, and the remaining range is rescaled toward full output. You can also choose a session-local preview center. Those controls affect only the separate preview values, not the raw plots or the timed resting measurements.
Keep the comparison honest. The preview illustrates our formula. It does not discover your game’s deadzone, recommend a setting or prove that a controller needs repair.
When a bigger deadzone is not enough
If you keep increasing the setting and lose useful control, stop treating the slider as the whole solution. Compare repeated resting checks and read what can cause stick drift. A deadzone can hide a symptom; it cannot restore a worn sensor or a stick that no longer returns consistently to center.
If the controller will not appear in the browser at all, start with connection help instead. No reading is not the same thing as a broken stick.
Sources and scope
This guide explains the concepts and our browser tool. It is not a hands-on compatibility report or a diagnosis of your controller.
- Valve: Steam Input source modesInput processing, deadzones and sensitivity. Labels and behavior vary between systems.
- MDN: Using the Gamepad APIThe browser interface used to read buttons and axes.
Our diagrams are original illustrations. Example values are made-up teaching examples, not recorded controller results.
PUT IT INTO PRACTICE
Try the deadzone preview
No download or account. Controller readings stay in your browser.
Try the deadzone previewRelated guides